Tire Changer Guide: How to Choose, Use & Buy the Right Machine
If you spend any time around wheels—whether you’re a weekend tinkerer, a professional tech, or a busy shop owner—a tire changer → is one of the most transformative tools you can add to your workspace. It replaces back-breaking pry-bar struggles with quick, controlled, rim-safe mounting and demounting.
This guide covers everything from the basics of how a tire changer works to choosing the right model, using it safely, budgeting for it, and comparing the top machines on the market. Ready to swap tires like a pro? Let’s dive in!
Quick Navigation
What Is a Tire Changer?
Parts of a Tire Changer
Why You Need a Tire Changer
Benefits of Using a Tire Changer
How to Choose the Best Tire Changer
Where to Buy a Tire Changer
How to Use a Tire Changer Machine
How Much Does a Tire Changer Cost?
Best Tire Changer Machines – Top Picks
Q&A (Frequently Asked Questions)
-
Overview of Q&A
- 1. What does a tire changer do?
- 2. Can I use a tire changer at home?
- 3. What's the difference between a manual and automatic tire changer?
- 4. Do I need a tire balancer with a tire changer?
- 5. How much does a tire changer cost?
- 6. What size tires can a tire changer handle?
- 7. Are tire changers safe to use?
- 8. How long does it take to change a tire with a tire changer?
- 9. Can a tire changer damage rims?
- 10. What power does a tire changer need?
Conclusion & Next Steps
What Is a Tire Changer?
Definition & Purpose
A tire changer is a specialized machine that removes an old tire from a wheel and installs a new one—quickly, safely, and without rim damage. In a shop, it replaces time-consuming manual prying and hammering.
- Breaks the tire’s bead (seal between tire and rim).
- Clamps the wheel securely so it can’t slip or scratch.
- Uses a duck-head tool to pry the tire off, then guides the new tire on.
- Saves technicians enormous effort and keeps wheel finishes pristine.
Types & Typical Machine Features
Tire changers come in sizes to match everything from motorcycle wheels to tractor tires, but most share the same core layout.
- Rim-clamp design: Four air-powered jaws secure the wheel on a rotating table.
- Swing-arm or tilt-back tower: Holds the duck-head tool that slips between bead and rim.
- Bead breaker shovel: A side-mounted paddle that pops the bead loose before demounting.
- Power source: Shop air drives the clamps and spin table; an electric motor provides rotation.
For a comprehensive, step-by-step guide on operating tire changers safely and effectively, refer to Hofmann Equipment's detailed tutorial: How to Use a Tire Machine: A Step-by-Step Guide for Safe Operation.
Whether you’re swapping low-profile performance tires or rugged truck rubber, the right tire changer turns a tough chore into a smooth, damage-free process.

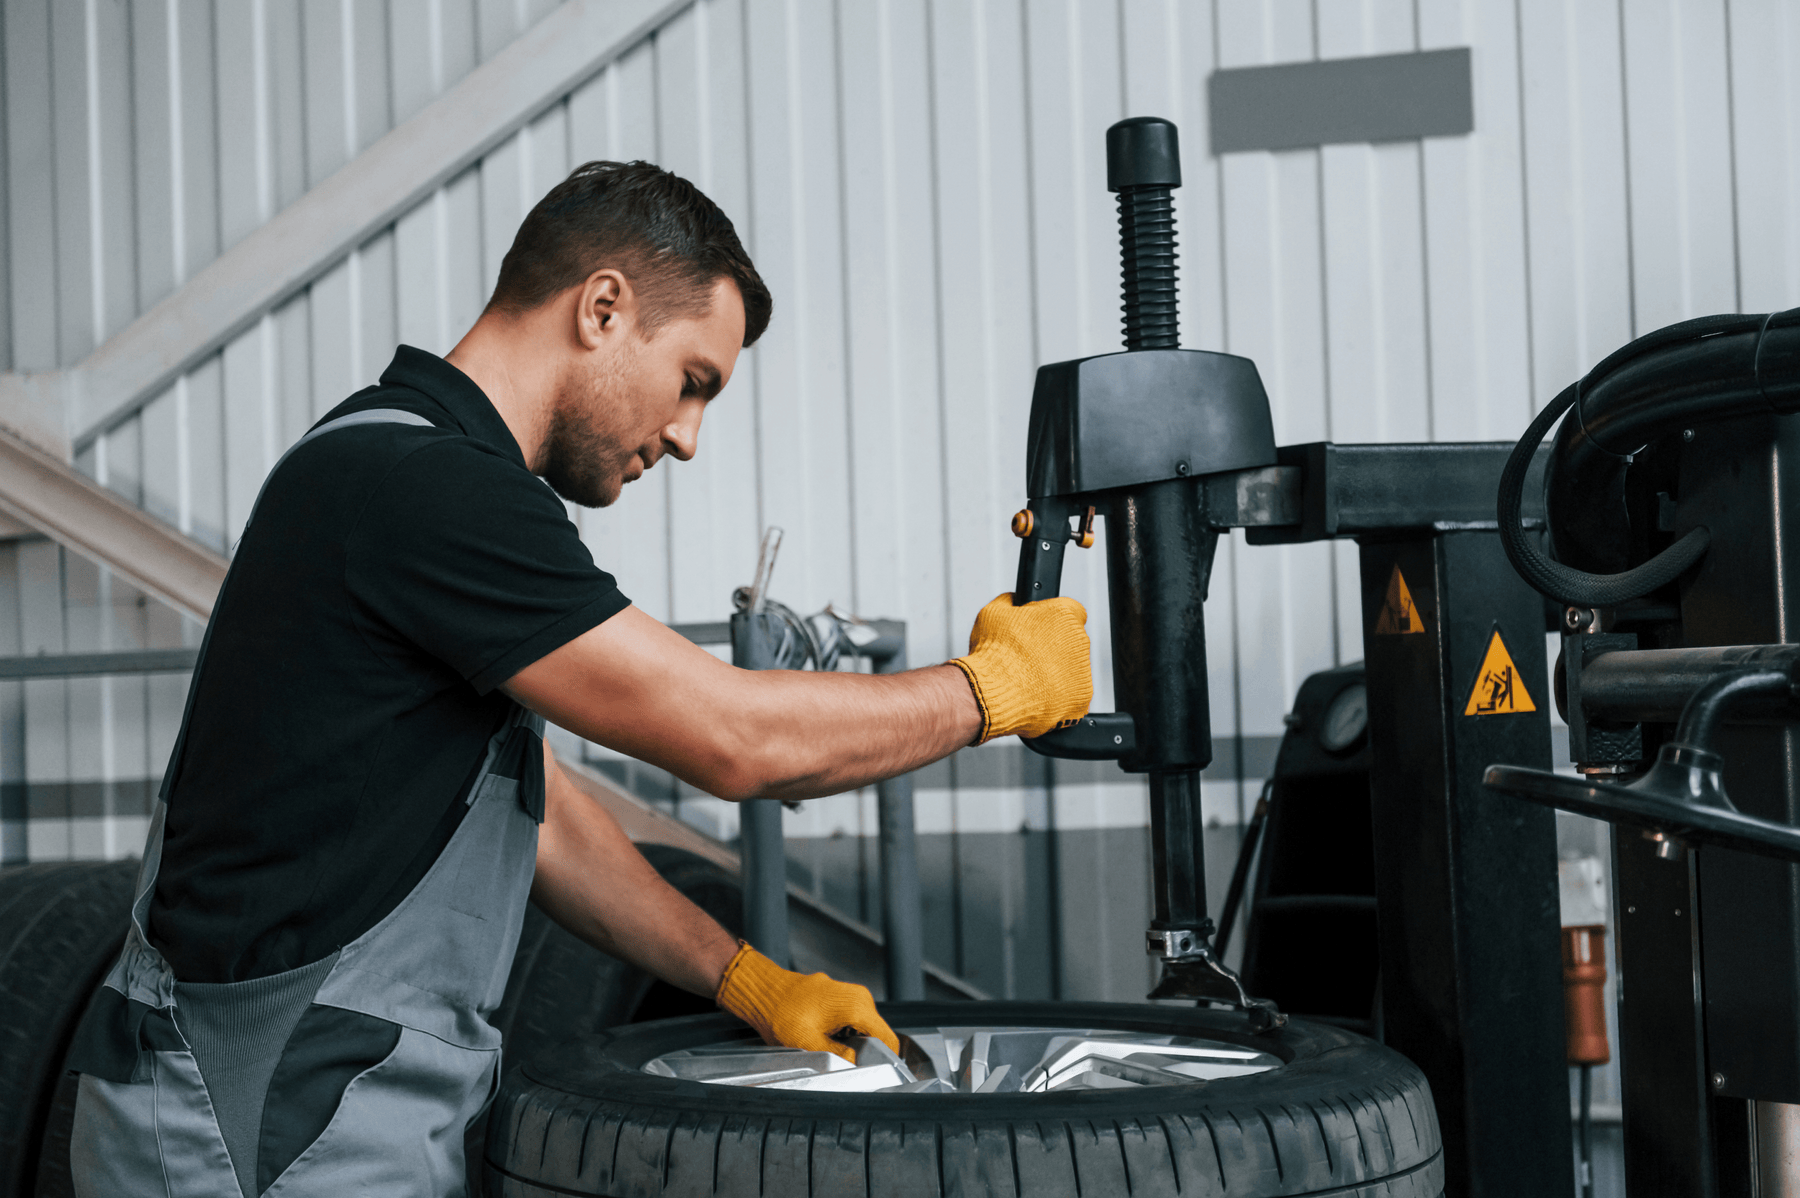
Parts of a Tire Changer 🔩
A powered tire changer looks complicated at first glance, but it’s really a collection of five core assemblies that work in harmony. Knowing what each one does will help you operate the machine confidently and avoid rim or tire damage.
Turntable & Clamps 🗜️
The flat rotating table is where the wheel rests.
- Four adjustable, air-powered jaws grab the rim from the inside or outside.
- A foot pedal opens/closes the jaws so your hands stay free to guide the wheel.
- The table spins clockwise or counter-clockwise for mounting or demounting.
Bead Breaker 💥
Before a tire comes off, the bead has to “unstick” from the rim.
- A side-mounted shovel presses the tire sidewall near the rim edge.
- Step on its pedal and the blade pops the bead loose with controlled force.
- Padded backing protects the wheel finish while you work.
Mount/Demount Arm & Duckhead 🦆
This swinging vertical arm is the business end of the machine.
- The curved “duckhead” tool slips between bead and rim to lift the tire over the lip.
- On manual models you lever the tire up, while automatic versions let the arm and turntable do the muscle work.
- Guides the new tire back on, keeping the bead aligned so it doesn’t pinch.
Foot Pedals & Controls 🎛️
Hands stay on the wheel; feet run the machine.
- Separate pedals operate clamp close/open, table spin, and bead breaker.
- Dual-direction spin helps with stubborn tires—reverse for that final bead pop.
- Some units add a pedestal joystick or side handles for extra finesse.
Air Inflation System
Once the new rubber is in place, it needs air.
- Built-in hose and gauge let you seat the bead without moving the wheel.
- Many machines include a “bead blaster” jet—one burst of high-pressure air to snap stubborn beads into place.
- Inflate only to the minimum pressure needed to seat; finish to spec in a safety cage or off the machine.
Together these components turn a sweaty, pry-bar chore into a quick, professional operation—saving wheels, tires, and your back. Have questions about any of these parts? Reach out to our team and we’ll walk you through the best setup for your workflow.

Why You Need a Tire Changer 🚀
Dedicated DIYers & Car Enthusiasts 🔧
For gearheads who swap wheels every season—or before every track day—owning a tire changer means freedom.
- Avoid $15–$25 per tire at the shop each swap.
- Change tires on your schedule—no waiting in line when everyone wants winter rubber.
- Independence from shop calendars lets you prep at midnight before a rally or car show. Looking for the sweet spot? Check out our Katool KT-T810—perfect for home garages and light-duty use.
Professional Mechanics & Auto Shops 🏁
A tire machine is as essential as a lift in a busy bay.
- Cuts a 30-minute manual wrestle into a 5-minute, tool-assisted job.
- Keeps tire sales and repairs in-house—no outsourcing, higher margins.
- Boosts shop throughput and customer satisfaction with same-day service. Try a workhorse like the Katool KT-T835 with assist arm—perfect for Auto Shops and Heavy-duty use.
Fleet Managers & Commercial Operations 🚚
Downtime equals lost revenue. A tire changer slashes it.
- Quickly swap or repair fleet tires on-site, day or night.
- Saves the cost and logistics of hauling trucks to an outside tire shop.
- Pays off fast for taxi services, delivery vans, farm equipment, or big-rig depots.
Motorcycle Shops & Racers 🏍️
Bike tires are smaller but trickier—specialized machines protect lightweight rims.
- Race teams can spin multiple sets between sessions without risking rim scratches.
- Repair shops with a moto-specific changer attract riders who fear generic car shops.
Still on the Fence? 💡
Add up yearly tire-shop fees for all your vehicles—cars, bikes, trailers, ATVs.
- A manual changer starts at a few hundred dollars; powered units a few thousand.
- Once purchased, every swap afterward is virtually free and done on your timetable.
- As one fleet supervisor summed it up: “No tire shop is open at 10 p.m.—but my garage is.”
If you change tires often enough to feel the pain in your wallet—or your schedule—a tire changer quickly turns that pain into self-reliant satisfaction. Still deciding? Reach out to us and we’ll help you find the right setup for your vehicle mix, budget, and shop needs. Happy swapping!

Benefits of Using a Tire Changer
Speed and Efficiency ⚡
With a powered machine, a job that can eat up half an hour per wheel shrinks to mere minutes. Instead of prying and wrestling each bead by hand, the turntable and duck-head tool do the grunt work while you guide the process.
- Typical hand-tool swap: 20–30 min per tire
- Powered changer: ≈ 5 min per tire—a full set in under 20 minutes
That time savings is huge when you’re mounting multiple sets for winter, track days, or customer rush jobs.
Reduced Physical Strain 💪
Breaking beads and levering stiff sidewalls is brutal on backs and knuckles. A tire changer delivers the mechanical advantage, so you stay upright and injury-free.
- Hydraulic or pneumatic bead breakers pop the seal with one pedal press
- No jumping on pry bars or pounding the rim with a mallet
Your body will thank you after the tenth swap of the day.
Protection for Wheels and Tires 🛡️
Modern alloy rims scratch easily, and low-profile tires can tear if forced. Machines use plastic-tipped duck-heads, padded clamps, and even pressure to keep both rim and rubber unscathed.
- Smooth jaws grip without gouging chrome or painted finishes
- Even bead pressure minimizes rim bends and tire pinches
If you cherish custom wheels, a machine is gentler than any pry bar.
Mastery of Tough Tires 🏁
Run-flats and ultra-low-profile performance tires are notoriously stubborn. Assist arms or press rollers built into mid- and high-tier changers tame those stiff beads without drama, turning a “never again” task into routine work.
Long-Term Savings 💰
Yes, a tire changer requires an up-front investment, but the payback is real. Skip the $15–$25 mounting fee every time you swap, or—if you run a shop—capture that revenue in-house while boosting turnaround speed.
- DIYers recoup costs over a few seasons of swaps
- Shops add a profitable service and cut outsourcing time
Factor in the convenience of late-night or last-minute changes, and owning a tire changer quickly feels less like a luxury and more like the smartest tool in the garage.
Need help finding the right tire changer for your garage or shop? Contact us here and we’ll walk you through the best fit based on your needs, experience, and budget. Need help finding the right tire changer for your garage or shop? Contact us here and we’ll walk you through the best fit based on your needs, experience, and budget. 🛠️

How to Choose the Best Tire Changer 🛠️
Type of Tire Changer: Manual vs. Semi-Automatic vs. Fully Automatic 🔄
Picking the right drive system is step one—and it mainly comes down to budget, volume, and the tires you fight with.
Manual changers are literally muscle-powered. Think of the red Harbor Freight stand: cheap, portable, and fine for smaller, taller-sidewall tires—but be ready for a workout and a learning curve.
- Pros: $50-$100 price, no electricity or air needed, ideal for ATVs, bikes, trailers.
- Cons: Serious elbow grease, risky on stiff low-profiles, technique-sensitive.
Semi-automatic swing-arm machines add air-powered clamps and an electric turntable. You swing the arm against the rim, lock it, and the motor does the spin. They’re the sweet spot for most DIYers and small shops.
- Pros: Affordable power assist, handles most car/light-truck tires, durable.
- Cons: Must readjust the duck-head each wheel change; still some manual levering.
Fully automatic (tilt-back) units lean back at a pedal press, return to the exact spot, and often include helper arms. Perfect for high-volume bays or anyone who wants zero fuss.
- Pros: Fastest setup time, great for run-flats and 20-inch+ rims, less skill required.
- Cons: Higher cost and larger footprint.
Leverless and center-post changers sit at the luxury end—awesome for delicate wheels or ultra-low profiles, but priced for upscale shops.
Vehicle Type & Tire Size Compatibility 🚗🏍️🚚
Make sure the machine’s clamping range and wheel width match what you actually service.
- Passenger cars & light trucks: A 12″-26″ rim-clamp range covers nearly everything.
- Motorcycles/ATVs: Either buy a bike-specific unit or at least add narrow-rim adapters and jaw protectors.
- Heavy-duty trucks or ag equipment: You’ll need a hydraulic, vertical-clamp beast built for 42″ rims—auto changers simply can’t handle them.
- Custom alloys: Favor center-post or leverless designs, or at least plastic-tipped jaws and duck-heads to safeguard expensive finishes.
Take a moment to measure your largest and smallest wheels now so you’re not stuck later with rims that don’t fit.
Usage Level: Home Garage vs. Commercial Shop 🏠⚙️
How many sets will you mount per week?
A hobbyist swapping a few sets a year can buy a lighter-duty swing-arm for $1–2k and expect a decade of service. In contrast, a shop cranking through ten sets a day should splurge on a tilt-back with dual assist arms—downtime and fatigue will cost more than the upgrade.
- Home use: Value, modest speed, smaller footprint. Katool KT-T800-class machines fit here.
- Pro shop: Reliability, rapid cycle time, brand parts support. Think Coats, Hunter, Corghi, or a Katool KT-T835 with helper arm.
Experience matters too; if you’re new, the extra automation of assist arms can prevent bead tears and rim scuffs.
Key Features and Accessories to Consider ✨
Little add-ons can make or break daily usability.
- Bead blaster: Built-in air burst seats stubborn beads in seconds—priceless for new tires.
- Assist arms: Single or dual press arms tame run-flats and stiff sidewalls.
- Power requirements: Check for 110V vs. 220V and be sure your compressor meets the PSI demand.
- Build quality: Heavier steel, replaceable plastic jaw inserts, and a strong warranty signal longevity.
- Modularity: Motorcycle adapters, wheel lifts, or future leverless conversions keep the machine useful as your needs grow.
Bottom line: match the changer’s capacity, automation level, and protective features to the wheels you’ll see and the volume you’ll tackle. Do that, and you’ll land on the “best” tire changer—for you. Happy mounting!

READY TO BUY?
Browse all vehicle lifts at Pitstop Pro. 2-post, 4-post, scissor, and alignment options from top brands, with Lift Specialists ready to help you choose.
Shop vehicle liftsWhere to Buy a Tire Changer 🛒
Finding the right machine is only half the battle—you also want a seller that can answer questions, honor warranties, and ship a 600-lb crate without drama. Here’s a quick roadmap to the most common buying channels, with pros and cons for each.
1. Specialized Equipment Retailers
Dedicated garage-equipment suppliers—whether online or a local distributor—offer the broadest selection and solid after-sales support.
- Why choose them? Warranty coverage, parts inventory, and a staff that actually knows tire changers.
- Good fit for: DIYers who need guidance and shops that rely on quick parts shipments.
- Example: PitStop Pro’s Tire Changers collection (Katool, Triumph, Atlas, and more) comes with tech support plus combo deals that bundle a wheel balancer.
2. Direct-from-Manufacturer
Some brands sell straight from their own websites, bypassing middlemen.
- Upside: Potentially lower prices and factory-level tech info.
- Watch-outs: Smaller overseas brands may have limited U.S. service centers—confirm who handles warranty repairs before you click “Buy.”
3. Online Marketplaces (Amazon, eBay)
Scroll long enough and you’ll see everything from brand-new Coats machines to no-name clones at half price.
- Pros: Convenience, user reviews, occasional bargains.
- Cons: Quality varies wildly; verify the seller is an authorized dealer if you expect warranty support.
- Rule of thumb: If a tilt-back changer is listed for the price of a manual tool, something’s amiss.
4. Used Equipment (Auctions, Classifieds)
A second-hand Coats or Hunter can be a steal—if you’re willing to inspect and maybe refurbish.
- Plug it in (or hook up air) before handing over cash; look for leaks, bent shafts, or missing jaw inserts.
- Shipping a beast like this gets pricey, so local pickup is ideal.
- Great for mechanically savvy buyers who don’t mind wrenching a little to save a lot.
5. Brick-and-Mortar Tool Stores & Harbor Freight
You’ll find entry-level manual units and the occasional pneumatic model on the shelf.
- Best for: Budget hobbyists who only need a basic changer and want to take it home today.
- Limitations: Minimal support on powered machines; expect to outgrow ultra-cheap models if you do more than a few tires a year.
Practical Buying Tips
- Plan the landing: Freight carriers drop curbside; arrange lift-gate service or have a forklift / strong friends ready.
- Check power & air: Make sure your compressor meets the PSI spec and your outlet matches the motor voltage before the crate arrives.
- Stock up on consumables: Pick up tire lube, bead paste, and rim-protector inserts in the same order—you’ll need them on day one.
- Consider the bundle: Tire changer and balancer combos can save you a few hundred bucks and simplify setup.
Bottom line: buy from a source you trust and one that can supply parts five years from now. A tire changer is more like a lift than a socket set—the service and warranty behind it matter just as much as the price tag. If you’ve got questions or need help choosing the right machine, reach out to our team—we’re here to help before and after the sale.

How to Use a Tire Changer Machine 🛞🛠️
Preparations 🧰
Start with a quick safety and tool check. Make sure the changer is powered, your air compressor is connected, and you’re wearing eye protection. Lay out the new tire, valve-core tool, plenty of tire lube, gauge, and any plastic jaw covers you might need for delicate rims.
- Deflate the tire completely by removing the valve core.
- Pop off old wheel weights and keep track of the core—you’ll reinstall or replace it later.
Break the Beads 💥
Freeing the bead on both sides is step one in earnest.
- Position the wheel in the bead-breaker shovel with the rim against the rubber pad.
- Press the pedal; the shovel will “pop” the bead loose—rotate and repeat until that side is free.
- Flip the wheel and break the second bead the same way.
You’ll know the bead is broken when the tire sidewall moves freely around the rim.
Clamp, Set the Duckhead & Lube 🔧
Place the wheel on the turntable and clamp it firmly—inside clamping for alloy wheels is safest.
- Swing the mount-arm so the duckhead hovers a credit-card width above the rim edge, then lock it.
- Brush a generous ring of tire lube around both beads and the rim lip; friction is the enemy.
Demount the Old Tire 🏃♂️
Lift the top bead over the duckhead, press the rotate pedal, and let the table peel the bead off while you keep light downward pressure opposite the duckhead so the bead drops into the rim’s center well. Repeat for the lower bead and the old tire will slide free.
Pro tip: With low-profile tires, use your assist arm (or a helper spoon) to keep the opposite bead in the drop center—this slack is critical for stubborn rubber.
Mount the New Tire 🚀
Lubricate the new tire’s beads, check direction arrows, and line up near the valve stem if needed.
- Bottom bead first: Angle it on, hook the bead under the duckhead, press rotate, and guide it over.
- Top bead second: Leverage or press the bead onto the duckhead, keep the opposite side in the drop center, and spin the table until it snaps on.
If you feel resistance, stop—add lube, reposition, and try again. Never force a dry bead.
Inflate and Seat the Beads 🌬️
Reinstall the valve core loosely (or leave it out for high-flow seating) and clip the air hose to the valve.
- Inflate until you hear two solid pops—top and bottom beads seating—usually 20–40 psi.
- Stop, tighten the valve core, and finish inflating to spec off the machine or in a safety cage.
A built-in bead blaster, if your changer has one, makes stubborn beads snap into place with a quick air burst.
Final Checks & Cleanup ✅
Release the clamps, remove the wheel, and give it a once-over. For a visual demonstration of these steps, watch this instructional video on using a tire changer machine.
- Confirm the molded bead line runs evenly around the rim on both sides.
- Check valve-stem for leaks with soapy water and torque TPMS sensors if present.
- Inflate to final pressure, cap the valve, and note the tire for wheel balancing next.
That’s it! With practice, the entire cycle—deflate, demount, mount, inflate—becomes a smooth, five-minute routine. Remember: plenty of lube, keep the bead in the drop center, and never put your fingers where the duckhead and rim meet. Happy swapping! 🏁

How Much Does a Tire Changer Cost? 💰
Tire changers run the gamut—from a bare-bones manual stand that costs less than a new set of tires, all the way up to heavy-duty, leverless machines that rival a small car in price. Below is a realistic look at what each tier costs, what you actually get for the money, and the extra expenses people often forget.
1. Manual Tire Changers — roughly $50 – $300
A manual stand (think the red Harbor Freight unit) uses your own strength for bead breaking and levering. It’s perfect if you only change a few trailer, lawn-tractor, or motorcycle tires each year and don’t mind the workout. Just expect a steeper learning curve and be prepared to scratch a rim or two until you master the technique.
2. Entry-Level Powered / Semi-Automatic — $1,000 – $1,500
Step up to a swing-arm, rim-clamp machine and you get an electric turntable plus air-powered jaws. These units tackle most passenger-car and light-truck tires and are a sweet spot for home enthusiasts who want powered convenience without breaking the bank. A model like the Katool KT-T800 (≈ $1,200) lands here.
3. Mid-Range Commercial (with Assist Arm) — $1,500 – $3,000
Add a pneumatic helper arm and suddenly stiff run-flats and 20-inch wheels are an everyday job, not a wrestling match. This bracket is popular with small repair shops and serious DIYers who value faster cycle times and reduced technician fatigue. Expect beefier motors, a sturdier chassis, and basic bead-blaster inflation jets.
4. High-End Professional (Tilt-Back, Dual Assist, Leverless) — $3,000 – $7,000
Here you get a tilt-back tower that remembers its position, dual press arms for ultra-low-profile tires, and sometimes leverless heads that never touch the rim face. Large dealerships and high-volume tire stores buy these for speed, wheel protection, and versatility.
5. Heavy-Duty Truck / Ag Changers — $5,000 – $15,000+
These hydraulic giants clamp truck and tractor wheels vertically and use powerful arms to pry off beads that a car changer could never budge. Unless you service semi-trucks or farm equipment, you’ll never need one—but fleets swear by them for cutting roadside downtime.
Hidden Costs to Remember
- Freight: Most powered machines weigh 500–900 lb and ship LTL freight. Budget a few hundred dollars unless “free shipping” is included.
- Setup accessories: Tire lube, bead paste brushes, rim-protector inserts, and a decent tire iron can add $50–$100.
- Wheel balancer: Mounting and balancing go hand in hand. A basic balancer runs another $1k–$3k.
- Power and air: Verify whether the changer is 110V or 220V and that your compressor meets the PSI requirement.
- Financing: Many retailers (including PitStop Pro) break a $2,000 purchase into ~$100 monthly payments, softening the cash hit.
What Most Buyers Spend
For home garages and small shops, a quality tire changer typically falls in the $1,000 – $3,000 window. Spend toward the lower end if you value budget over convenience; spend higher if you want press-arms or expect to mount run-flats regularly. A good machine should last a decade or more, so divide the sticker price by years of service—often the “expensive” model ends up costing only pennies per tire.

Our Top Picks
Here are the standouts from this category, picked by our Lift Specialists for real-world fit and value.

AMGO BP-9: 9,000 lb 2-Post (Top 2-Post Pick)
💳 Affirm & Shop Pay Installments at checkout | $2,335
Best-selling 2-post lift for home garages. 9,000 lb capacity, symmetric design, single-point safety release. AMGO's volume seller with US parts support.
Best for: Home garages with 11-foot+ ceilings working on cars and light trucks.
View Pricing & Specs →★★★★★ Verified reviews · Authorized dealer · Lift Specialists ready to help

Katool KT-4H110: 11,000 lb 4-Post (Top 4-Post Pick)
💳 Affirm & Shop Pay Installments at checkout | $3,299
Best-value 4-post in the lineup. True 11K capacity, free-standing install, 181.9-inch runway, drip trays included. Built for full-size trucks and SUVs.
Best for: Storage and service garages needing real 11K capacity at a mid-budget price point.
View Pricing & Specs →★★★★★ Verified reviews · Authorized dealer · Lift Specialists ready to help
FAQ (Frequently Asked Questions)
Tire Changer FAQ 🔧 – Get Straight Answers to the Most Common Questions
Q: What does a tire changer do?
A: A tire changer is a machine that removes and installs tires on wheels. It separates the tire bead from the rim and mounts or demounts the tire with minimal effort and no damage to the wheel.
Q: Can I use a tire changer at home?
A: Yes. Many manual and semi-automatic tire changers are compact and affordable enough for home garages. Just ensure you have a stable floor, power (if needed), and basic training.
Q: What's the difference between a manual and automatic tire changer?
A: Manual tire changers use hand tools and muscle to remove tires, while automatic or semi-automatic models use powered arms and bead breakers to make the job faster and easier.
Q: Do I need a tire balancer with a tire changer?
A: Yes, if you want smooth, safe driving. A tire changer removes and installs the tire; a wheel balancer ensures the weight is evenly distributed around the rim for proper rotation.
Q: How much does a tire changer cost?
A: Prices range from $300 for basic manual units to $3,000–$10,000 for professional-grade automatic and leverless machines. Expect to pay more for heavy-duty or truck models.
Q: What size tires can a tire changer handle?
A: Most standard machines can handle 10" to 24" wheels. Heavy-duty models can go up to 56" for commercial trucks. Always check the machine’s clamping and rim capacity.
Q: Are tire changers safe to use?
A: Yes—if used properly. Always follow the manufacturer’s safety instructions, use the correct mounting tools, and never exceed the rated capacity or spin tires manually.
Q: How long does it take to change a tire with a tire changer?
A: With a powered tire changer, mounting or removing one tire typically takes 2–5 minutes. Manual changers take longer depending on experience.
Q: Can a tire changer damage rims?
A: Improper use can cause damage, especially on aluminum or custom rims. Use plastic protectors, proper lube, and avoid metal-to-metal contact when possible.
Q: What power does a tire changer need?
A: Most powered models run on 110V or 220V electricity and require a 90–120 psi air line for bead breakers and inflation. Manual units need no power at all.
Conclusion & Next Steps 🚙💨
Key Takeaways
- Save time and money: A good machine trims a 30-minute manual wrestle to a five-minute powered swap and eliminates $15–$25 per tire fees.
- Match the machine to your needs: Light DIY use? A manual or swing-arm unit like the Katool KT-T800 is perfect. Small-shop volume? The Triumph NTC-950 series adds speed and helper arms. Big-rig tires? Step up to the Katool KT-TV910 heavy-duty beast.
- Work smart and safe: Always deflate fully, drown beads in lube, keep fingers clear of the duck-head, and let the drop-center do the stretching.
- Think long-term value: Quality tire changers land in the $1k–$3k range for most users and will last a decade or more with basic care—just pennies per tire over time.
Ready to Gear Up?
Browse PitStop Pro’s complete Tire Changer lineup → for detailed specs, photos, and real-world customer reviews. Pair your changer with a wheel balancer and you’ve got a full tire-service bay at home.
📞 Need advice? Call 470-208-2754 and chat with a PitStop Pro specialist, or drop us a note via the contact form for a quick, friendly reply.
Join the Conversation
Have experience with any of these machines? Share tips, questions, or success stories in the comments—let’s keep the community rolling smoothly.
With the right tools, even big jobs become easy. Happy tire changing, and may every ride be perfectly balanced!
Keep Reading
Ready to buy?
Find the right lift at Pitstop Pro
We carry the full vehicle lift lineup: 2-post, 4-post, scissor, and alignment models from Atlas, AMGO, Tuxedo, Triumph, Katool, and more. Talk to a Lift Specialist or browse the catalog.
Shop all liftsTalk to a Lift SpecialistLifetime customer support and a free fitment consult before you order. No sales tax outside GA, IL, OH.
Leave a comment